
I have a boatload of boxed macaroni and cheese. Various brands, but all pretty much the same. I got them from our local food pantry and I've been trying to figure out what to do with them, other than the typical Tuna Mac casserole that uses canned tuna, a can of cream of mushroom soup and a box of mac & cheese. Of course I could just make it according to the package directions, or make it seem closer to homemade by adding some shredded cheese.
Broccoli Chicken Mac & Cheese Bake
Boxed Mac & Cheese
Frozen Broccoli Cuts (or fresh steamed broccoli if you have it.)
Canned White Meat Chicken
Shredded Cheese (I use a colby/jack blend)
I took an aluminum foil roasting pan, sprayed it with cooking spray and set it aside while I made the mac & cheese according to the package direction. I used 3 boxes for the size roasting pan I had. (It seems like a lot, but this is enough for 2 meals, and a few hungry teenager snacks.) I then defrosted a bag of broccoli and opened a couple of cans of white meat chicken. Stirred in the broccoli and chicken, and added a bit of shredded cheese. I then covered it with foil and put it in the freezer. When it's time to serve, put it in the oven at 325 degrees for about an hour. (It helps if you put it in the fridge the night before so it begins defrosting.
The broccoli and canned white meat chicken make it a meal when served with a salad. And it's healthier than just eating it plain, cuz you're getting some veggies and protein.
You could also kick it up a bit by adding a sprinkle of pepper or cayenne pepper, or maybe a bit of garlic powder. I will definitely be making this again and I'm going to try it with some garlic and pepper.
Lola's Victory Garden©2009-2010
Wednesday, April 6, 2011

Sunday, September 12, 2010
Lola's Eggplant Rotolo
My garden has been producing, but not very prolifically due to lack of rain. In the mean time, I thought I'd share with you an Original Recipe By Lola, Lola's Eggplant Rotolo. I did not plant eggplant this year, so I purchased mine from my local farmer's market.
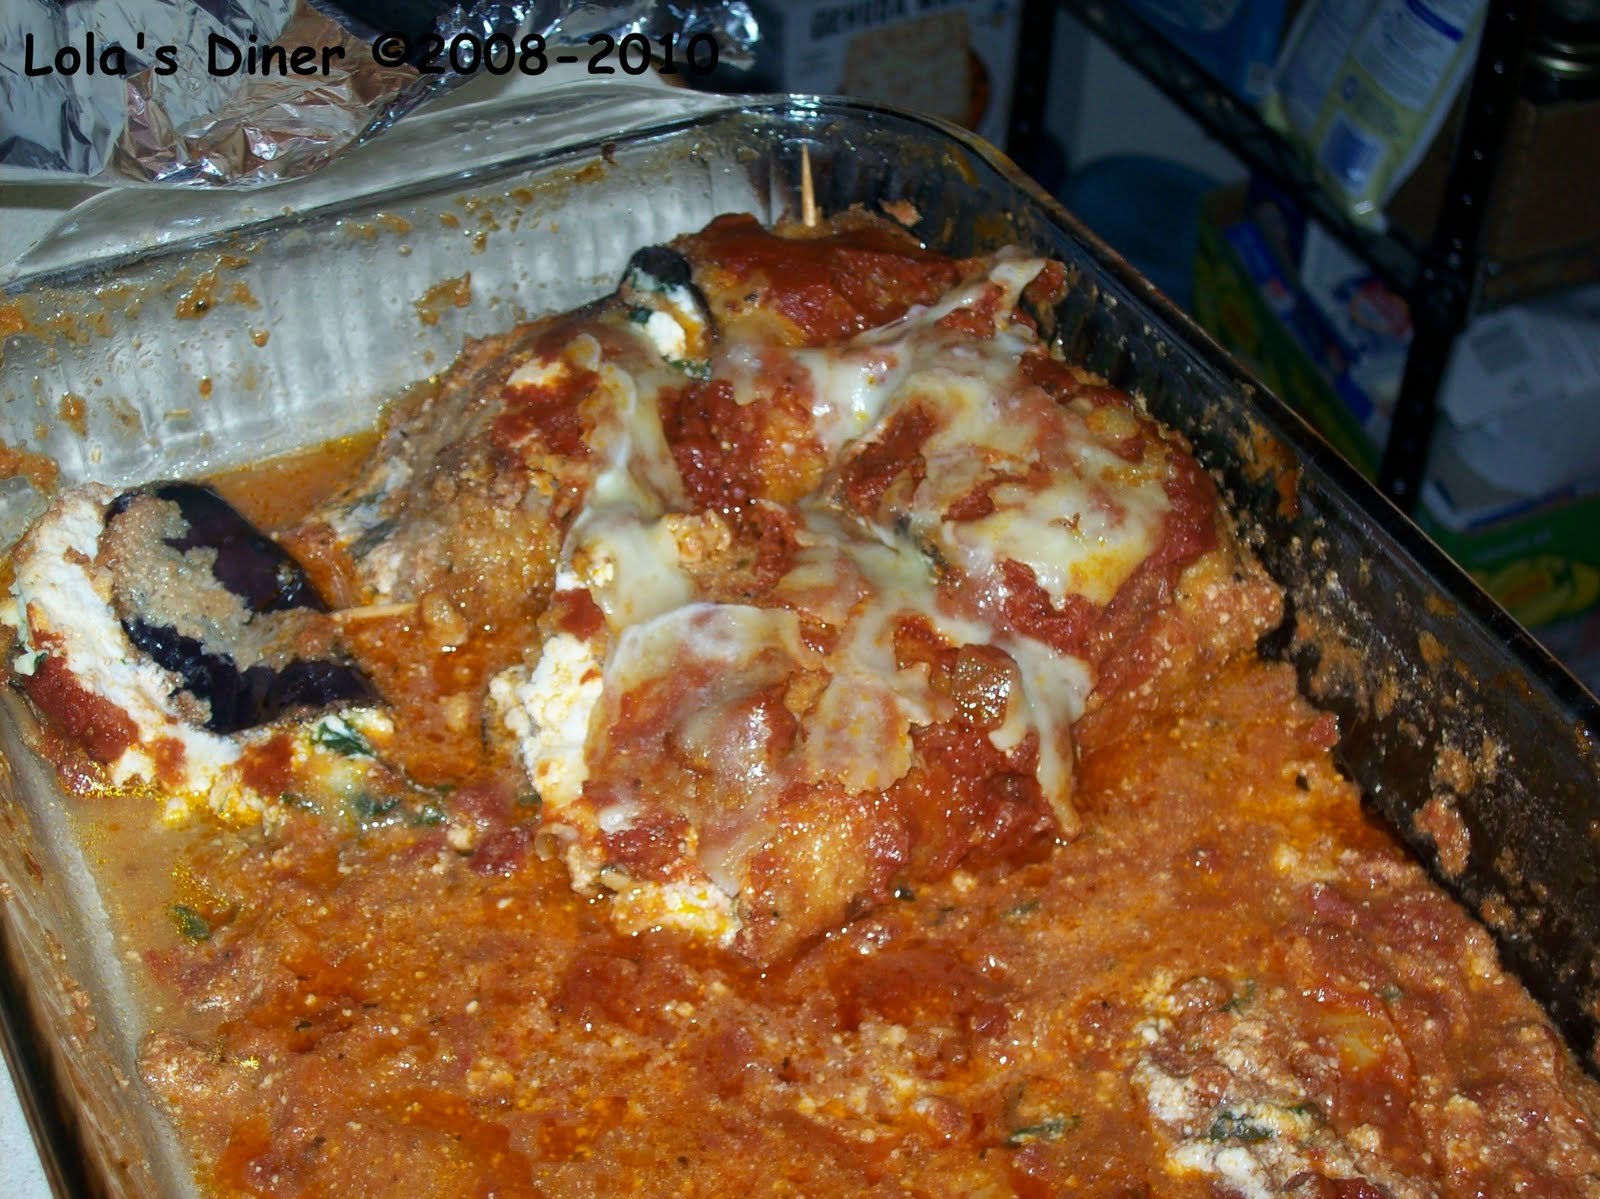
OMG! This is so delicious. I was trying to duplicate a recipe for an Eggplant Rotolo at a local tapas bar. This turned out even better than the original. I've attached a photo, but it was taken after we ate dinner. It doesn't do it justice.
Lola's Eggplant Rotolo
 1 large Eggplant
1 large tub of Ricotta Cheese
Mozzarella Cheese, shredded (about 1 pound)
1/2 of 1 small box of frozen Spinach (use fresh if you have it.)
3 eggs, beaten
Vegetable Oil
Cooking Spray
Bread Crumb Mixture:
Bread Crumbs
Parmesan Cheese
Spices to season Bread Crumb Mixture:
Salt
Pepper
Basil
Oregano
Spaghetti Sauce (about 1 quart):
Mine is a secret, so you'll have to substitute your own recipe or use store bought sauce.
Slice Eggplant into 1/4 inch long slices. Salt eggplant and layer in strainer/colander with paper towels. Put a plate and a heavy weight, like a large can or book. Place strainer/colander into a larger bowl to catch the drainage. This allows the moisture from the Eggplant to be removed and it removes the bitterness from the Eggplant. Allow to sit with the weight on it for several hours. You will notice a brownish colored liquid in the drain bowl. Discard this, then thoroughly rinse and dry each slice of Eggplant. (I know rinsing afterward sounds counter intuitive, but trust me, this process removes the bitterness and you will definitely notice the difference if you skip this step.)
Mix Bread Crumb Mixture thoroughly in a bowl large enough to dip the Eggplant slices into.
Dip Eggplant into beaten eggs, then dredge in Bread Crumb Mixture.
In a large frying pan, pour about a 1/4 inch layer of Vegetable Oil. Heat oil. Test oil by putting a drop of water into it. If it disburses, the oil is hot enough. Fry Breaded Eggplant slices on both sides until golden brown. Allow to drain on cooling racks, or paper towels. Set aside.
Defrost Frozen Spinach in Microwave Oven. Squeeze water out and press a clean paper towel over the top to remove any excess moisture.
In a medium bowl combine Ricotta Cheese and Spinach.
Spoon a layer of the Ricotta Cheese/Spinach mixture onto each slice. Using a spoon, dribble a bit of Spaghetti Sauce down the middle of each slice. Sprinkle a small amount of Shredded Mozzarella Cheese over the top, being sure to reserve some to top off the dish before baking. Roll each slice individually, using a single wooden toothpick to secure each.
In a 9x12 baking dish, spray thoroughly with Cooking Spray. Add a layer of Spaghetti Sauce. Add each Eggplant Roll to the baking dish.
Top with reserved Shredded Mozzarella Cheese. Use cooking spray to coat a sheet of Aluminum Foil large enough to cover baking dish. Cover baking dish with foil. Bake in 325 oven for 40 minutes. Remove Aluminum Foil, bake an additional 5-15 minutes until cheese on top browns.
Enjoy!
Lola's Victory Garden©2009-2010
OMG! This is so delicious. I was trying to duplicate a recipe for an Eggplant Rotolo at a local tapas bar. This turned out even better than the original. I've attached a photo, but it was taken after we ate dinner. It doesn't do it justice.
Lola's Eggplant Rotolo
 1 large Eggplant
1 large tub of Ricotta Cheese
Mozzarella Cheese, shredded (about 1 pound)
1/2 of 1 small box of frozen Spinach (use fresh if you have it.)
3 eggs, beaten
Vegetable Oil
Cooking Spray
Bread Crumb Mixture:
Bread Crumbs
Parmesan Cheese
Spices to season Bread Crumb Mixture:
Salt
Pepper
Basil
Oregano
Spaghetti Sauce (about 1 quart):
Mine is a secret, so you'll have to substitute your own recipe or use store bought sauce.
Slice Eggplant into 1/4 inch long slices. Salt eggplant and layer in strainer/colander with paper towels. Put a plate and a heavy weight, like a large can or book. Place strainer/colander into a larger bowl to catch the drainage. This allows the moisture from the Eggplant to be removed and it removes the bitterness from the Eggplant. Allow to sit with the weight on it for several hours. You will notice a brownish colored liquid in the drain bowl. Discard this, then thoroughly rinse and dry each slice of Eggplant. (I know rinsing afterward sounds counter intuitive, but trust me, this process removes the bitterness and you will definitely notice the difference if you skip this step.)
Mix Bread Crumb Mixture thoroughly in a bowl large enough to dip the Eggplant slices into.
Dip Eggplant into beaten eggs, then dredge in Bread Crumb Mixture.
In a large frying pan, pour about a 1/4 inch layer of Vegetable Oil. Heat oil. Test oil by putting a drop of water into it. If it disburses, the oil is hot enough. Fry Breaded Eggplant slices on both sides until golden brown. Allow to drain on cooling racks, or paper towels. Set aside.
Defrost Frozen Spinach in Microwave Oven. Squeeze water out and press a clean paper towel over the top to remove any excess moisture.
In a medium bowl combine Ricotta Cheese and Spinach.
Spoon a layer of the Ricotta Cheese/Spinach mixture onto each slice. Using a spoon, dribble a bit of Spaghetti Sauce down the middle of each slice. Sprinkle a small amount of Shredded Mozzarella Cheese over the top, being sure to reserve some to top off the dish before baking. Roll each slice individually, using a single wooden toothpick to secure each.
In a 9x12 baking dish, spray thoroughly with Cooking Spray. Add a layer of Spaghetti Sauce. Add each Eggplant Roll to the baking dish.
Top with reserved Shredded Mozzarella Cheese. Use cooking spray to coat a sheet of Aluminum Foil large enough to cover baking dish. Cover baking dish with foil. Bake in 325 oven for 40 minutes. Remove Aluminum Foil, bake an additional 5-15 minutes until cheese on top browns.
Enjoy!
Lola's Victory Garden©2009-2010
Friday, June 18, 2010
Finally! Garden Photos!
Due to my back issues, and lack of help with the garden from my kids, I decided to do a raised bed garden. This way I can tend to weeds and pick the produce myself and no bending or stooping is required. I already had most of the supplies (railroad ties, cinder blocks, planter box recycled from curbside, large pots and several bags of dirt unused from last year.) I purchased 2 pre-cut pieces of plywood to form the bottom of my raised beds, along with more bags of dirt.
I planted Beefsteak Tomato plants in the raised bed area of the cinder blocks, and in the large planters (ran out of room, lol!). I also planted 2 Kohlrabi plants in the raised bed area of the cinder blocks and 2 in the large orange planter. I planted 4 varieties of peppers (A sweet Italian Red Pepper variety, Banana Peppers, Jalapeno Peppers and Green Bell Peppers), and 4 Roma Tomato plants in the planter box. I planted Basil plants in the openings of the cinder blocks. Basil aids in pest control for the tomato plants. And besides, no one can ever have too much Basil. Lol!


 I still haven't planted my Petunias. I hope to get to them soon. I need to purchase more dirt.
Lola's Victory Garden ©2009-2010
I planted Beefsteak Tomato plants in the raised bed area of the cinder blocks, and in the large planters (ran out of room, lol!). I also planted 2 Kohlrabi plants in the raised bed area of the cinder blocks and 2 in the large orange planter. I planted 4 varieties of peppers (A sweet Italian Red Pepper variety, Banana Peppers, Jalapeno Peppers and Green Bell Peppers), and 4 Roma Tomato plants in the planter box. I planted Basil plants in the openings of the cinder blocks. Basil aids in pest control for the tomato plants. And besides, no one can ever have too much Basil. Lol!


So how's your garden growing?
Lola's Victory Garden ©2009-2010
Tuesday, June 8, 2010
Garden Procrastination
Yes, there will be a Lola's Victory Garden this year. I'm just getting a late start, as usual. Last week I purchased my plants. Mostly Beefsteak Tomatoes, a few Roma Tomatoes (they only had a few left), basil, green bell pepper, jalapeno pepper, yellow banana pepper, and I think Kohlrabi.
Last week I also purchased a few 1/4 pieces of plywood for part of the base of my raised garden beds.
Monday we set about to assemble the raised beds and purchased 6 additional bags of soil to add to the 3 bags left from last year. I utilized the landscape timbers I purchased last year, along with the recently purchased plywood, and cinder blocks which I got from freecycle.com a few years ago. I also will be utilizing a large planter box which I literally picked up the night before trash pick up one night. I will be recycling Styrofoam blocks from packaging I've saved up to raise up the bottom of the planter box, so as not to use an excessive amount of soil. My raised beds don't look pretty, but they accomplish what I need. That is, that they are raised beds and will allow me to tend to my garden more easily due to my back issues.
Rain is expected on Tuesday, so actual planting will not commence until the weather clears.
I will have photos of the garden beds as soon as I am able to take some.
How's your garden growing?
Lola's Victory Garden©2009-2010
Last week I also purchased a few 1/4 pieces of plywood for part of the base of my raised garden beds.
Monday we set about to assemble the raised beds and purchased 6 additional bags of soil to add to the 3 bags left from last year. I utilized the landscape timbers I purchased last year, along with the recently purchased plywood, and cinder blocks which I got from freecycle.com a few years ago. I also will be utilizing a large planter box which I literally picked up the night before trash pick up one night. I will be recycling Styrofoam blocks from packaging I've saved up to raise up the bottom of the planter box, so as not to use an excessive amount of soil. My raised beds don't look pretty, but they accomplish what I need. That is, that they are raised beds and will allow me to tend to my garden more easily due to my back issues.
Rain is expected on Tuesday, so actual planting will not commence until the weather clears.
I will have photos of the garden beds as soon as I am able to take some.
How's your garden growing?
Lola's Victory Garden©2009-2010
Thursday, April 29, 2010
B-bye Entrecard
I will be leaving Entrecard May 5th. Please become a follower and bookmark my site so you don't miss out on anything at Lola's Victory Garden.
Why am I leaving? Too many of my blog pals have been getting hit with Trojans and Viruses while visiting sites through Entrecard to drop. I don't think I even have that many blog pals, and when I'm hearing it this often amongst a small group, that means the danger is too much to ignore. Entrecard is ignoring the problem, so it's time to leave.
Yes, I will miss the traffic, but it hasn't been that much lately anyway. Time to cut the apron strings and be free.
The other 2 blogs I own will also be leaving Entrecard, so please visit them, follow them and bookmark them so you don't miss out.
Lola's Diner
Fire Crotch Rocket
Lola's Victory Garden©2009-2010
Tuesday, April 20, 2010
Garden Thoughts
As the weather turns more Spring-like (well not really the past couple days, it's been fairly cool, which I do like) thoughts turn to gardening plans.
Unfortunately, this years vegetable garden will be scaled down from last year. I had originally hoped to expand, but since this year I will be handling it solo, except for when I can badger the kids into helping me, smaller will have to do.
I envision a raised bed using cinder blocks and landscape timbers. (I already have plenty on hand.) Probably mostly tomatoes and zucchini, with some herbs.
In terms of other gardening activities, I plan on adding landscaping rock to the front of the porch area. I'm thinking the white rocks, rather than river rock. That will make the Lilac Bushes stand out when they are in bloom.
I have a large planter box, about 1' x 4' that I need to paint. Looks a bit like this one:
 I can't decide on the color. It was originally a boring brown, but needs repainting. My house is a kind of grayish-blue. I'm debating whether to go with a Country Blue or Barn Red. Any thoughts?
Lola's Victory Garden
©2009-2010
Unfortunately, this years vegetable garden will be scaled down from last year. I had originally hoped to expand, but since this year I will be handling it solo, except for when I can badger the kids into helping me, smaller will have to do.
I envision a raised bed using cinder blocks and landscape timbers. (I already have plenty on hand.) Probably mostly tomatoes and zucchini, with some herbs.
In terms of other gardening activities, I plan on adding landscaping rock to the front of the porch area. I'm thinking the white rocks, rather than river rock. That will make the Lilac Bushes stand out when they are in bloom.
I have a large planter box, about 1' x 4' that I need to paint. Looks a bit like this one:
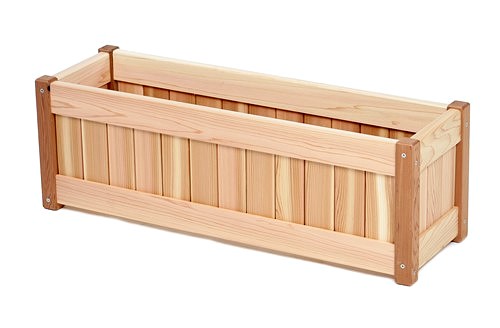 I can't decide on the color. It was originally a boring brown, but needs repainting. My house is a kind of grayish-blue. I'm debating whether to go with a Country Blue or Barn Red. Any thoughts?
Lola's Victory Garden
©2009-2010
Wednesday, February 24, 2010
Scalloped Potatoes And Ham
This is one of my favorites my Mom used to make. It uses leftover ham and potatoes. When potatoes are $2.99 for 10 pounds, this is a real inexpensive meal. When I bake a ham for the holidays I cut the leftovers into cubes and put into zip-top bags. Each bag contains enough for a large batch of Scalloped Potatoes And Ham. I also take the bone and put it in a zip-top bag and throw it in the freezer for a future date for making Split Pea Soup.
When my Mom used to make this, it wasn't a side dish, it was dinner. When I make it for my family I use a large baking pan in the hopes of having leftovers the next day. Every time our son manages to eat all the leftovers before I look for them in the fridge the next day for lunch. I guess that tells you how good it is.
Lola's Scalloped Potatoes And Ham
 Russet Potatoes (peeled and sliced thinly)
Ham (cubed)
Milk (you can use Cream, Whole Milk, 2%, 1% or Skim Milk.)
Flour
Butter
Salt to taste
Pepper to taste
Non-stick cooking spray
If you slice your potatoes very thin, the top layer gets very crispy. If you don't care for that, slice them about 1/4 inch thick. For the Milk, you can go full fat with the Cream, or you can even use Skim Milk, it still turns out delicious.
Spray your baking dish or pan with non-stick cooking spray. Layer sliced potatoes in bottom of pan. Lightly sprinkle with Salt, Pepper and Flour. Sprinkle some of the Ham pieces. Cut the Butter into small bits and dot the mixture in the pan with some Butter. Add another layer of sliced Potatoes and continue layering until you reach the top of the pan. Add Milk, being careful not to overfill your pan. You want enough liquid to make the creamy sauce, but not so much that it bubbles over while cooking.
Cover and bake at 350 degrees about 30-45 or until done. You may want to take off the cover for the last 5 minutes or so to brown the top layer.
Lola's Victory Garden
©2009-2010
When my Mom used to make this, it wasn't a side dish, it was dinner. When I make it for my family I use a large baking pan in the hopes of having leftovers the next day. Every time our son manages to eat all the leftovers before I look for them in the fridge the next day for lunch. I guess that tells you how good it is.
Lola's Scalloped Potatoes And Ham
 Russet Potatoes (peeled and sliced thinly)
Ham (cubed)
Milk (you can use Cream, Whole Milk, 2%, 1% or Skim Milk.)
Flour
Butter
Salt to taste
Pepper to taste
Non-stick cooking spray
If you slice your potatoes very thin, the top layer gets very crispy. If you don't care for that, slice them about 1/4 inch thick. For the Milk, you can go full fat with the Cream, or you can even use Skim Milk, it still turns out delicious.
Spray your baking dish or pan with non-stick cooking spray. Layer sliced potatoes in bottom of pan. Lightly sprinkle with Salt, Pepper and Flour. Sprinkle some of the Ham pieces. Cut the Butter into small bits and dot the mixture in the pan with some Butter. Add another layer of sliced Potatoes and continue layering until you reach the top of the pan. Add Milk, being careful not to overfill your pan. You want enough liquid to make the creamy sauce, but not so much that it bubbles over while cooking.
Cover and bake at 350 degrees about 30-45 or until done. You may want to take off the cover for the last 5 minutes or so to brown the top layer.
Lola's Victory Garden
©2009-2010
Tuesday, February 16, 2010
Pantry Porn
 This is my canned good pantry. I have all my dry goods in a slim tall pantry cabinet in my kitchen, which I will not photograph because even though I painstakingly re-organized it about a month ago, the kids have trashed it. I'm sure my canned good pantry will shortly experience the same thing. (Note: This is not the way I would have organized the canned goods, you can't see what's behind things. See that beige shelving unit? It's empty. I would have utilized that so I could see everything I had, like grocery store shelves. But beggars can't be choosers, the kids organized this with some supervision by Anastasia. It definitely is better than bags of canned goods on the floor, like it was before they re-organized it.)
Storm @ Confessions of A Psychotic Housewife posted awhile back asking for photos of pantries. So I'm a little late!
As a kid my Mom always had a well stocked pantry so that she always had basics on hand and didn't have to run to the store all the time. I've learned it comes in handy when I've experienced issues with delayed disability checks too. I always know I have food on hand. Last November when my check was delayed we had a full pantry and freezer to keep us fed. Had I not planned ahead, we would have been without food. Keeping a stocked pantry also helps me take advantage of sales too. I replenish items as they go on sale, so I'm paying the lowest price.
Lola's Victory Garden
©2009-2010
Tuesday, February 2, 2010
Chicken Cacciatore
I've had a taste for Chicken Cacciatore lately and since cut-up chicken was at a fairly good price I decided to made it on Sunday. Oh my! I've forgotten how good it is.
The recipe amounts are estimates, as I did not measure, I did it from memory from when my Italian Mom used to make it. Well, not exactly...I cheated and used canned Hunt's Traditional Sauce.
Lola's Easy Chicken Cacciatore
1 cut-up chicken (or whatever chicken parts are your favorite)
Olive Oil (a couple tablespoons for browning the chicken)
Flour (about 1 1/2 Cups for dredging the chicken)
Rosemary (about a teaspoon, crushed)
Basil (about a tablespoon)
Oregano (about 1 1/2 teaspoons)
Pepper (about a 1/2 teaspoon)
Kosher Salt (or regular salt, about 1 1/2 teaspoons)
Your favorite tomato sauce (about 32 ounces)
3/4 Cup Dry White Wine
Mix together the Flour, Rosemary, Basil, Oregano, Pepper and Salt thoroughly. Dredge the chicken in the flour mixture. In a large skillet, heat Olive Oil over medium-high heat. Add the chicken pieces to the pan and saute until brown. Transfer to a plate and set aside.
Make your own sauce, or use prepared sauce. Pour into your crockpot. Adjust the spices if you like. I jacked up the canned sauce with about 3 tablespoons of garlic, 1 1/2 teaspoons of Basil and 1/2 a teaspoon of Oregano. Add 3/4 cup of Dry White Wine to the sauce. Stir thoroughly. Use tongs to transfer the browned chicken pieced into the crockpot. I set the crockpot for 4 hours and then turned it down to keep warm until dinner time.
 (Sorry about the lousy photo. This was part of the leftovers. I should have taken the photo on Sunday, but I forgot.) I served my Chicken Cacciatore with fettucine, but you can serve it with your favorite pasta. (Sadly it was from a box, I had no time to make fresh using my pasta maker. I had to run errands all afternoon for my sick partner. Next time I hope to make my own fresh pasta to accompany this.)
Lola's Victory Garden
©2009-2010
The recipe amounts are estimates, as I did not measure, I did it from memory from when my Italian Mom used to make it. Well, not exactly...I cheated and used canned Hunt's Traditional Sauce.
Lola's Easy Chicken Cacciatore
1 cut-up chicken (or whatever chicken parts are your favorite)
Olive Oil (a couple tablespoons for browning the chicken)
Flour (about 1 1/2 Cups for dredging the chicken)
Rosemary (about a teaspoon, crushed)
Basil (about a tablespoon)
Oregano (about 1 1/2 teaspoons)
Pepper (about a 1/2 teaspoon)
Kosher Salt (or regular salt, about 1 1/2 teaspoons)
Your favorite tomato sauce (about 32 ounces)
3/4 Cup Dry White Wine
Mix together the Flour, Rosemary, Basil, Oregano, Pepper and Salt thoroughly. Dredge the chicken in the flour mixture. In a large skillet, heat Olive Oil over medium-high heat. Add the chicken pieces to the pan and saute until brown. Transfer to a plate and set aside.
Make your own sauce, or use prepared sauce. Pour into your crockpot. Adjust the spices if you like. I jacked up the canned sauce with about 3 tablespoons of garlic, 1 1/2 teaspoons of Basil and 1/2 a teaspoon of Oregano. Add 3/4 cup of Dry White Wine to the sauce. Stir thoroughly. Use tongs to transfer the browned chicken pieced into the crockpot. I set the crockpot for 4 hours and then turned it down to keep warm until dinner time.
 (Sorry about the lousy photo. This was part of the leftovers. I should have taken the photo on Sunday, but I forgot.) I served my Chicken Cacciatore with fettucine, but you can serve it with your favorite pasta. (Sadly it was from a box, I had no time to make fresh using my pasta maker. I had to run errands all afternoon for my sick partner. Next time I hope to make my own fresh pasta to accompany this.)
Lola's Victory Garden
©2009-2010
Monday, January 18, 2010
Depression Era Cooking/Homemade Pasta...
This Homemade Pasta recipe in this post is from "Wisdom, Memories, and Recipes From The Great Depression - Clara's Kitchen" by Clara Cannucciari and her Grandson, Christopher Cannucciari. The name may look familiar if you've checked out her depression cooking videos on youtube.
A little book review before the recipe...I was a bit disappointed with the book. I was hoping for lots of depression era recipes, ways to stretch staples. Instead of that, there were colorful stories from Clara's past and not very many recipes. Of course she did include her Poorman's Dinner, which is a big hit with my kids. I also may try the Lentils with Rice. Many of the recipes I wouldn't even consider inexpensive. Meatballs, eggplant, caprese salad all call for expensive ingredients - beef, eggplant (unless you grow your own) and mozzarella balls (unless you make your own).
Homemade Pasta
1 1/4 Cups All Purpose Flour
2 Large Eggs
Pinch of Salt
1. Add the ingredients to a food processor, or make the dough by hand, first pouring the flour into a mound on a clean surface. Break the eggs into the well and add the salt. With a fork, start working the rest of the flour into the eggs in the center. When the dough becomes difficult to work with a fork, use your hands to work the rest of the flour into the eggs. Knead the dough for several minutes, until it has a nice, squishy texture. You may need to add more flour as you go.
2. Cut the dough into six equal pieces and flatten each piece with a rolling pin. Pre the dough through your pasta machine, folding each piece in thirds as you roll it through. Keep pressing the dough through the machine until you achieve the desired thickness. After each rolling, lay out the dough on clean towels, making sure the edges don't touch. Rest them on the towels for about 10 minutes, giving them some time to dry out.
3. Pass the dough through the cutter of your pasta machine or cut by hand. Cook the pasta to the desired doneness and toss it with your favorite pasta topping. Just be careful, homemade pasta cooks much faster than dry. You really only need to warm it---probably not more than 3 or 4 minutes at most, depending on the thickness and shape.
I've been wanting to make homemade pasta for awhile now. This past weekend I snagged a Popeil Automatic Pasta Machine from my local www.bookoo.com for just $15. That's less than 1 meal out. I'll be honest, I'm a sucker for those infomercials and I'm amazed that I never did buy one when the infomercials first came out. According to those original infomercials (1990's), homemade pasta costs 25-30 cents per pound, a bit more now, but still a bargain, you can't beat the taste, and it's fun too!
 Sunday night I made Chicken Parmigiana with homemade Vermicelli. The reviews were rave! We haven't had homemade pasta since going to a local (very pricey) italian restaurant. The meal at a restaurant would have easily cost $18.95 per person. Everyone in my family is now offering suggestions on what kind of pasta to make next.
Lola's Victory Garden
©2009-2010
A little book review before the recipe...I was a bit disappointed with the book. I was hoping for lots of depression era recipes, ways to stretch staples. Instead of that, there were colorful stories from Clara's past and not very many recipes. Of course she did include her Poorman's Dinner, which is a big hit with my kids. I also may try the Lentils with Rice. Many of the recipes I wouldn't even consider inexpensive. Meatballs, eggplant, caprese salad all call for expensive ingredients - beef, eggplant (unless you grow your own) and mozzarella balls (unless you make your own).
Homemade Pasta
1 1/4 Cups All Purpose Flour
2 Large Eggs
Pinch of Salt
1. Add the ingredients to a food processor, or make the dough by hand, first pouring the flour into a mound on a clean surface. Break the eggs into the well and add the salt. With a fork, start working the rest of the flour into the eggs in the center. When the dough becomes difficult to work with a fork, use your hands to work the rest of the flour into the eggs. Knead the dough for several minutes, until it has a nice, squishy texture. You may need to add more flour as you go.
2. Cut the dough into six equal pieces and flatten each piece with a rolling pin. Pre the dough through your pasta machine, folding each piece in thirds as you roll it through. Keep pressing the dough through the machine until you achieve the desired thickness. After each rolling, lay out the dough on clean towels, making sure the edges don't touch. Rest them on the towels for about 10 minutes, giving them some time to dry out.
3. Pass the dough through the cutter of your pasta machine or cut by hand. Cook the pasta to the desired doneness and toss it with your favorite pasta topping. Just be careful, homemade pasta cooks much faster than dry. You really only need to warm it---probably not more than 3 or 4 minutes at most, depending on the thickness and shape.
I've been wanting to make homemade pasta for awhile now. This past weekend I snagged a Popeil Automatic Pasta Machine from my local www.bookoo.com for just $15. That's less than 1 meal out. I'll be honest, I'm a sucker for those infomercials and I'm amazed that I never did buy one when the infomercials first came out. According to those original infomercials (1990's), homemade pasta costs 25-30 cents per pound, a bit more now, but still a bargain, you can't beat the taste, and it's fun too!
 Sunday night I made Chicken Parmigiana with homemade Vermicelli. The reviews were rave! We haven't had homemade pasta since going to a local (very pricey) italian restaurant. The meal at a restaurant would have easily cost $18.95 per person. Everyone in my family is now offering suggestions on what kind of pasta to make next.
Lola's Victory Garden
©2009-2010
Tuesday, January 5, 2010
What's for dinner when I don't feel like cooking?
Check my home canned stash.
BBQ'd Pork (also called Pulled Pork)
 I got the recipe from Mom's Cafe Home Cooking - Homecanned Barbeque Pork. I did make one modification though. After the meat was done, I removed the cooked roast from the cooking liquid, pressing out as much liquid as possible, removed visible fat and then refrigerated the roast separate from the cooking liquid. This allowed me to remove the excess fat from the cooking liquid/sauce and remove any fat I missed on the roast. Then I shredded the roast with 2 forks, added the de-fatted cooking liquid/sauce, heated it to a boil, stirring to insure consistent temperature, and then canned per Garden Gnome's instructions. As you can see from my jar, very little fat.
When we opened the jar we spooned it into a saucepan, heated to a boil and served on white bread. (That's what we had, and since this was a last second meal, there was no time to make rolls with the bread machine.) This was just as delicious as if I had made the roast the very same day. Nice and moist and flavorful. I actually canned it last summer. Delish!
Lola's Victory Garden
©2009-2010
BBQ'd Pork (also called Pulled Pork)
 I got the recipe from Mom's Cafe Home Cooking - Homecanned Barbeque Pork. I did make one modification though. After the meat was done, I removed the cooked roast from the cooking liquid, pressing out as much liquid as possible, removed visible fat and then refrigerated the roast separate from the cooking liquid. This allowed me to remove the excess fat from the cooking liquid/sauce and remove any fat I missed on the roast. Then I shredded the roast with 2 forks, added the de-fatted cooking liquid/sauce, heated it to a boil, stirring to insure consistent temperature, and then canned per Garden Gnome's instructions. As you can see from my jar, very little fat.
When we opened the jar we spooned it into a saucepan, heated to a boil and served on white bread. (That's what we had, and since this was a last second meal, there was no time to make rolls with the bread machine.) This was just as delicious as if I had made the roast the very same day. Nice and moist and flavorful. I actually canned it last summer. Delish!
Lola's Victory Garden
©2009-2010
Friday, January 1, 2010
New Year's Eats
Some foods that are traditionally eaten on New Year's Day are Hoppin John and Smothered Collard Greens. Both are supposed to bring prosperity and good luck. I started making Hoppin John a couple of years ago. This year was my first attempt at Smothered Collard Greens.
I use Emeril Lagasse's recipe for Hoppin' John. Our son was a bit upset with me for not adding smoked sausage like I did last year. Oh well, you go with what you have and what you can afford, right? For the Smothered Collard Greens I kind of combined parts of 2 recipes I saw online. I made a lot so that I can serve the leftovers with ham on Saturday.
Lola's Smothered Collard Greens
 3 bags of Pre-washed Collard Greens
1 Ham Hock
8 ounces of Bacon cut into small slices
Kosher Salt (a good amount, about a tablespoon, more or less to taste)
Tony Chachere's Original Creole Seasoning (to taste, I used about a teaspoon) (You can substitute any hot sauce.)
Medium Size Red Onion Sliced
water
I started with the Ham Hock in about 3 cups of water and added in Collard Greens as they wilted and continued to add more as there was room in the pot.
In a frying pan I cooked the bacon until crisp, then removed and reserved. In the bacon drippings, I sauteed the sliced Red Onion until transluscent, but not yet browned.
I then added in some of the Collard Greens and cooked them in with the onions and bacon drippings. I then added the bacon.
Then I removed the Ham Hock (I added that to the Hoppin John) and poured the contents of the frying pan into the pot of Collard Greens and let it simmer. It's done when the Collard Greens are a deep green in color and are soft.
The Hoppin John is always a hit because my kids love all kinds of soups and beans. The Smothered Collard Greens I wasn't too sure of, however, our son went back to refill his plate with the Smothered Collard Greens 4 times! I'm hoping he doesn't eat the leftovers for breakfast!
Lola's Victory Garden
©2009-2010
I use Emeril Lagasse's recipe for Hoppin' John. Our son was a bit upset with me for not adding smoked sausage like I did last year. Oh well, you go with what you have and what you can afford, right? For the Smothered Collard Greens I kind of combined parts of 2 recipes I saw online. I made a lot so that I can serve the leftovers with ham on Saturday.
Lola's Smothered Collard Greens
 3 bags of Pre-washed Collard Greens
1 Ham Hock
8 ounces of Bacon cut into small slices
Kosher Salt (a good amount, about a tablespoon, more or less to taste)
Tony Chachere's Original Creole Seasoning (to taste, I used about a teaspoon) (You can substitute any hot sauce.)
Medium Size Red Onion Sliced
water
I started with the Ham Hock in about 3 cups of water and added in Collard Greens as they wilted and continued to add more as there was room in the pot.
In a frying pan I cooked the bacon until crisp, then removed and reserved. In the bacon drippings, I sauteed the sliced Red Onion until transluscent, but not yet browned.
I then added in some of the Collard Greens and cooked them in with the onions and bacon drippings. I then added the bacon.
Then I removed the Ham Hock (I added that to the Hoppin John) and poured the contents of the frying pan into the pot of Collard Greens and let it simmer. It's done when the Collard Greens are a deep green in color and are soft.
The Hoppin John is always a hit because my kids love all kinds of soups and beans. The Smothered Collard Greens I wasn't too sure of, however, our son went back to refill his plate with the Smothered Collard Greens 4 times! I'm hoping he doesn't eat the leftovers for breakfast!
Lola's Victory Garden
©2009-2010
Sunday, December 27, 2009
Sfinconi
Sfincioni is like a cold Italian pizza. There is really no other way to describe it. I’m not exactly sure how my grandmother made it, as I never actually saw her, but this is my best guess based on how it looked and tasted.
Pizza Dough (I make pizza dough using the dough cycle on my bread maker.)
1 Can of Tomato Paste
Sliced Onion (sweet yellow or red onion)
1 Can of Anchovies (optional)
Olive Oil
Dried Basil and Dried Oregano (or Italian Seasoning)
Grated Parmesan, Romano or Pecorino Cheese
Cornmeal (for dusting the pan)
The dough is baked on cookie sheets (or baking pans of similar size). I make a pizza dough in my bread machine. (I have also in years past used the boxed pizza dough or the Pillsbury.)
Olive oil is drizzled on the cookie sheet and cornmeal sprinkled, before putting the pizza dough on the cookie sheet. The dough is pricked with a fork so that you don’t get large air bubbles when baking.
Brush the top of the dough lightly with tomato paste (not a lot, I think this was another way of being frugal, just a bit brushed on for flavor).
Sprinkle with dried basil and oregano.
Place slices of onion on top.
For those who like anchovies, add some anchovies over the top.
Grate a good quality parmesan or romano or pecorino cheese over the top.
Lightly drizzle olive oil over the top.
Bake at 400 degrees until done. (In a stove that would be probably 20 minutes.)
This is served cold or at room temperature.
It’s perfect for Christmas Eve because it can be made a day or 2 in advance. It gives the hostess the opportunity to join in the fun or go sneak off upstairs to wrap a few gifts.
 It looks so good I want to make some today, but you have no idea how much time it takes to cook in a Nesco Roaster. I think 2 trays, cooking 1 at a time took almost 3 hours. We still don't have our stove hooked up. Between the holidays and the snow it's impossible to get a hold of a handyman around here.
Lola's Victory Garden
©2009
Pizza Dough (I make pizza dough using the dough cycle on my bread maker.)
1 Can of Tomato Paste
Sliced Onion (sweet yellow or red onion)
1 Can of Anchovies (optional)
Olive Oil
Dried Basil and Dried Oregano (or Italian Seasoning)
Grated Parmesan, Romano or Pecorino Cheese
Cornmeal (for dusting the pan)
The dough is baked on cookie sheets (or baking pans of similar size). I make a pizza dough in my bread machine. (I have also in years past used the boxed pizza dough or the Pillsbury.)
Olive oil is drizzled on the cookie sheet and cornmeal sprinkled, before putting the pizza dough on the cookie sheet. The dough is pricked with a fork so that you don’t get large air bubbles when baking.
Brush the top of the dough lightly with tomato paste (not a lot, I think this was another way of being frugal, just a bit brushed on for flavor).
Sprinkle with dried basil and oregano.
Place slices of onion on top.
For those who like anchovies, add some anchovies over the top.
Grate a good quality parmesan or romano or pecorino cheese over the top.
Lightly drizzle olive oil over the top.
Bake at 400 degrees until done. (In a stove that would be probably 20 minutes.)
This is served cold or at room temperature.
It’s perfect for Christmas Eve because it can be made a day or 2 in advance. It gives the hostess the opportunity to join in the fun or go sneak off upstairs to wrap a few gifts.
 It looks so good I want to make some today, but you have no idea how much time it takes to cook in a Nesco Roaster. I think 2 trays, cooking 1 at a time took almost 3 hours. We still don't have our stove hooked up. Between the holidays and the snow it's impossible to get a hold of a handyman around here.
Lola's Victory Garden
©2009
Tuesday, December 15, 2009
Superb Cowboy Stew
Now that the garden is on hiatus, I thought I would start posting some frugal recipes. I've reserved several books from the library on Depression era cooking and I can't wait for them to arrive at my library so I can check them out, try out some recipes and share them with you.
This recipe I got from Stephanie @ A Year Of Slow Cooking, which by the way is an awesome site for crockpot recipes. Stephanie got it from The Adventures Of The Headless Family.
I've made this several times and it's always a hit with our kids. In fact the other night night when I made this our daughter said it was 'great'. Then our son said "No, it's superb. That's better than excellent."
 I made several modifications based on what I had on hand. First off, I was dividing a 5 pound package of ground meat. To stretch it further, I took about 3/4 of a pound and added about a 1/2 to 3/4 of a cup of Oatmeal. Threw it in my KitchenAid mixer with the mixing blade on a low speed to combine it. (I then browned the meat/oatmeal mixture as usual. No one could tell I did this and it did not affect the flavor.) Then I mixed the rest of the meat in 3 batches with 2 Eggs, Oatmeal, Worchestershire Sauce, a bit of Catsup, Onion Powder and Garlic Powder and formed part of the meat into 1/3 pound Hamburger Patties using a Hamburger Press. I made 5 1/3 pound burgers and the rest of the meat went into a very large loaf pan for meatloaf.
I only had Diced Tomatoes with Onion and Peppers, so I used that.
No stores near me carry Ranch Beans, so I substituted Chili Beans. (Use the beans and the sauce.)
I used a 4 ounce can of El Zapato Tomato Sauce.
1 can of Butter Beans, drained.
1 Can of Garbanzo Beans.
A sprinkle of Cayenne Pepper Powder (about a 1/4 teaspoon.).
Instead of adding water I used the liquid from 1 can of Potatoes.
I was out of corn, so I skipped it.
Here is the recipe from A Year Of Slow Cooking:
Cowboy Stew
This makes a lot. Make sure that your crockpot is at least 5qts.
You can serve this with homemade biscuits or even better...cornbread.
Lola's Victory Garden
©2009
This recipe I got from Stephanie @ A Year Of Slow Cooking, which by the way is an awesome site for crockpot recipes. Stephanie got it from The Adventures Of The Headless Family.
I've made this several times and it's always a hit with our kids. In fact the other night night when I made this our daughter said it was 'great'. Then our son said "No, it's superb. That's better than excellent."
 I made several modifications based on what I had on hand. First off, I was dividing a 5 pound package of ground meat. To stretch it further, I took about 3/4 of a pound and added about a 1/2 to 3/4 of a cup of Oatmeal. Threw it in my KitchenAid mixer with the mixing blade on a low speed to combine it. (I then browned the meat/oatmeal mixture as usual. No one could tell I did this and it did not affect the flavor.) Then I mixed the rest of the meat in 3 batches with 2 Eggs, Oatmeal, Worchestershire Sauce, a bit of Catsup, Onion Powder and Garlic Powder and formed part of the meat into 1/3 pound Hamburger Patties using a Hamburger Press. I made 5 1/3 pound burgers and the rest of the meat went into a very large loaf pan for meatloaf.
I only had Diced Tomatoes with Onion and Peppers, so I used that.
No stores near me carry Ranch Beans, so I substituted Chili Beans. (Use the beans and the sauce.)
I used a 4 ounce can of El Zapato Tomato Sauce.
1 can of Butter Beans, drained.
1 Can of Garbanzo Beans.
A sprinkle of Cayenne Pepper Powder (about a 1/4 teaspoon.).
Instead of adding water I used the liquid from 1 can of Potatoes.
I was out of corn, so I skipped it.
Here is the recipe from A Year Of Slow Cooking:
Cowboy Stew
1 pound browned hamburger (can use turkey)
2 cloves chopped garlic
1 can tomato sauce
1 can diced Italian seasoned tomatoes
1 can corn, drained
2 cans whole baby potatoes, drained
1 can tomatoes with green chilies
1 can Ranch Style beans (with the baked beans in the grocery store)
1 cup water
sliced jalapeno peppers for garnish (optional)
Brown the hamburger with the chopped garlic cloves on the stove top. Drain the fat. Let sit in the pan for a bit to cool.
Open all of you cans, and dump them into the crockpot. Drain the corn and the potatoes, but add the rest of the can liquid to the crockpot.
After adding all of the can contents, add the browned meat and a cup of water. Stir with a spoon to mix a bit.
Cover and cook on low for 8-10 hours, or on high for 4-5. Soup and stew tastes better the longer you cook it, so opt for the longer cooking time if you can.
Garnish with sliced jalapeno peppers, if desired. (Both the kids and I added lots of jalapeno peppers, but that photo didn't turn out.)
You can serve this with homemade biscuits or even better...cornbread.
Lola's Victory Garden
©2009
Wednesday, December 2, 2009
Tomatillo Salsa
 Tomatillo Salsa Verde II
From The Big Book of Preserving the Harvest.
Ingredients:
2 lbs about 8 cups tomatillos
2 cups chopped onions
1-4 hot pepper, seeded and chopped
1 cup fresh cilantro, minced
4-8 garlic cloves
1/2 cup lemon juice
1/2 cup lime juice
Directions
After removing husks, halve and then coarsely chop the tomatillos.
Lightly coat the bottom of a large pot with oil, turn the burner on high, and add all the ingredients. Stir frequently and bring to a boil.
Lower the temperature and let the salsa simmer for about 20 minutes.
Other recipes call for cumin, oregano, water, oil, lemon thyme, salt, pepper, tarragon, cognac, sugar, tart apples, vinegar, and sweet red peppers. Feel free to add a bit of any or all of these to your salsa according to your likes before you bring it to a boil.
Carefully fill sterilized pint or half-pint jars and process them for 20 minutes using the boiling-water-bath method.
Note: As the Salsa "ages" in the jar, the heat of the Hot Peppers (I use Jalapenos) intensifies. If you like your salsa only slightly spicey, you're going to want to make sure that you remove all or nearly all the seeds and membranes from the peppers. Also, remember when prepping Hot Peppers to wear gloves because they can cause skin irritation.
Lola's Victory Garden
©2009
Wednesday, October 28, 2009
Coming soon...Tomatillo Salsa
I've been saying I needed to stop by the Mexican grocery to get some tomatillos. Actually it's the place to go after the Farmer's Markets close to get the best deals on produce.
And did I get the best deal! Last year I paid $0.99 and $0.89 a pound for tomatillos. I paid $0.49 a pound! I bought almost 10 pounds. That should translate to about 3 batches of salsa. I also got cilantro, 2 bunches for $1.00 which is pretty good. I forgot garlic cloves, so I've got to run to the store before I begin my first batch.
According to eHow.com, this is how to select tomatillos:
Please check out my post at Lola's Diner. I need to raise $250 to avoid foreclosure on my house. I'm selling Ad Space as well as Guest Blog Posts. I am also taking donations. Please check out my post and if you can help, I would be very grateful. Prayers are also welcome.
Lola's Victory Garden
©2009
And did I get the best deal! Last year I paid $0.99 and $0.89 a pound for tomatillos. I paid $0.49 a pound! I bought almost 10 pounds. That should translate to about 3 batches of salsa. I also got cilantro, 2 bunches for $1.00 which is pretty good. I forgot garlic cloves, so I've got to run to the store before I begin my first batch.
According to eHow.com, this is how to select tomatillos:
1. Locate the tomatillos in the supermarket. They are now found in most U.S. grocery stores, and usually located next to the hot peppers.Stay tuned for the recipe.
2. Select a tomatillo and pick it up. Most of the tomatillos will still have the papery husk attached. This papery husk should be in tact and relatively crispy and free from moisture or mold.
3. Peel the husk back slightly and examine the color of the tomatillo. It should be bright green and evenly colored. Avoid selecting tomatillos having black or brown spots, which can be an indication of spoilage.
4. Squeeze the tomatillo. It should be quite firm and will not yield much to pressure from your hands. Soft tomatillos may be spoiled and should be avoided.
Please check out my post at Lola's Diner. I need to raise $250 to avoid foreclosure on my house. I'm selling Ad Space as well as Guest Blog Posts. I am also taking donations. Please check out my post and if you can help, I would be very grateful. Prayers are also welcome.
Lola's Victory Garden
©2009
Sunday, October 18, 2009
It's Been Awhile...
Remember this?

Now it looks like this:

It's so sad. I haven't been able to bring myself to buy salad fixin's since we ate the last tomato from our garden. We didn't have a very good harvest. We didn't even have enough left to can any spaghetti sauce. Very disappointing harvest.
So it's on to other things. I'm going to be stopping by the mexican grocery the next time I'm in the neighborhood to see if I can get a good price on some Tomatillos for salsa. We're down to just 1 jar and we love the stuff. I'm also going to be canning some jams. I froze the fruit because I didn't have time to can when I purchased them at their peak of flavor and at the best price. I'll also be making a pepper jelly for serving over cream cheese with crackers. It's perfect for serving during the holidays. Watch for these and other posts coming up because Lola's Victory Garden is not shutting down for the season. I will be continuing to post canning recipes and frugal tips until I begin work on next years garden, so be sure to continue to stop by to see what's new.
Lola's Victory Garden
©2009

Now it looks like this:

It's so sad. I haven't been able to bring myself to buy salad fixin's since we ate the last tomato from our garden. We didn't have a very good harvest. We didn't even have enough left to can any spaghetti sauce. Very disappointing harvest.
So it's on to other things. I'm going to be stopping by the mexican grocery the next time I'm in the neighborhood to see if I can get a good price on some Tomatillos for salsa. We're down to just 1 jar and we love the stuff. I'm also going to be canning some jams. I froze the fruit because I didn't have time to can when I purchased them at their peak of flavor and at the best price. I'll also be making a pepper jelly for serving over cream cheese with crackers. It's perfect for serving during the holidays. Watch for these and other posts coming up because Lola's Victory Garden is not shutting down for the season. I will be continuing to post canning recipes and frugal tips until I begin work on next years garden, so be sure to continue to stop by to see what's new.
Lola's Victory Garden
©2009
Monday, August 31, 2009
What's For Lunch From The Garden?
I'm home alone now for the most part during the day so lunch is lazy. Yes, I said it, lazy. I'm not cooking anything, I'm not using more than 3 ingredients and I'm not Mickey D'ing it.
So lunch is from the garden.
Last week we had cucumbers, so cucumber, tuna and mayonnaise sandwiches were my thing. Slice the cucumber super thin and layer on top of toast spread with a thin layer of mayo. Add a little mayo to the tuna, spoon it on top of the cucumber slices, then layer more cucumber slices on top of the tuna and top it with a slice of toast with a little mayo. Season with salt if you like, but I skip it because salt is not my friend.
This week, :( no cucumber. What to do? BLT sounds good, but I'm not frying bacon. Too much mess and then what happens with the rest of the package? Do I fry it and save it for another day. (Hello! I have a teenage boy, if he sees bacon already cooked, he thinks delicious snack!) Do I put the package away with just 2 strips missing? No, then that means I have to use it within x number of days. (Solve for x? Not me, I don't do algebra.) Solution? Baconnaise!
Behold: The Tomato and Baconnaise Sandwich:
 No lettuce? Well, we did have some, but that would be a bother to find it in the fridge because the kids have yet to learn that lettuce is a vegetable and it belongs in the Vegetable Bin. Besides, this is so good just as it is.
Home grown tomato + Baconnaise + Toast = bliss!
Disclosure: This is not a paid ad, but if the Baconnaise people would like to reward me with some bacony goodness, I would be happy to take it.
PS: Baconnaise is available at Jewel Foods in the same aisle as regular mayonnaise.
Lola's Victory Garden
©2009
So lunch is from the garden.
Last week we had cucumbers, so cucumber, tuna and mayonnaise sandwiches were my thing. Slice the cucumber super thin and layer on top of toast spread with a thin layer of mayo. Add a little mayo to the tuna, spoon it on top of the cucumber slices, then layer more cucumber slices on top of the tuna and top it with a slice of toast with a little mayo. Season with salt if you like, but I skip it because salt is not my friend.
This week, :( no cucumber. What to do? BLT sounds good, but I'm not frying bacon. Too much mess and then what happens with the rest of the package? Do I fry it and save it for another day. (Hello! I have a teenage boy, if he sees bacon already cooked, he thinks delicious snack!) Do I put the package away with just 2 strips missing? No, then that means I have to use it within x number of days. (Solve for x? Not me, I don't do algebra.) Solution? Baconnaise!
Behold: The Tomato and Baconnaise Sandwich:
 No lettuce? Well, we did have some, but that would be a bother to find it in the fridge because the kids have yet to learn that lettuce is a vegetable and it belongs in the Vegetable Bin. Besides, this is so good just as it is.
Home grown tomato + Baconnaise + Toast = bliss!
Disclosure: This is not a paid ad, but if the Baconnaise people would like to reward me with some bacony goodness, I would be happy to take it.
PS: Baconnaise is available at Jewel Foods in the same aisle as regular mayonnaise.
Lola's Victory Garden
©2009
Sunday, August 23, 2009
Our Weekend Garden Harvest
 These are part of our take from our garden from Friday and today. We also ate a cucumber about that size and had about 1/2 that bowl full of cherry tomatoes that we used in a wonderful salad yesterday.
All I did was slice the cucumber thin, arrange on a plate, then quarter some of those cherry tomatoes. Then sprinkle on some Feta Cheese crumbles. The sweetness of those cherry tomatoes combined with the taste of the Feta Cheese was just fantastic.
Still no zucchini (I'm betting they all come at once.) And no broccoli yet, but that should be ready soon. The tomatillos are looking good, I'm thinking the papery skin has to be...well, papery before they are ready to be picked. (At least that's the way they are in the store when I've bought them to can Tomatillo Salsa.)
Our Sunflowers are growing like crazy. I wish I had a photo for you, but I'm taking it easy today and trying to recuperate from all the crazy running around and driving I've been doing. My bad back hasn't appreciated all that and it's been letting me know, so today I'm just taking it easy. Our daughter was nice enough to go pick those veggies, she's a good helper.
I have a question for anyone who has grown sunflowers before. Are all the seeds good for eating, or does it depend on the variety? Also, do you pick them and dry them, bake them, ???? Has anyone used the seeds from the sunflowers they've grown for eating or store them for use later in their bird feeders?
Lola's Victory Garden
©2009
Thursday, August 6, 2009
Slow But Sure
We're starting to get some tomatoes in. A few cherry tomatoes here, a few there. I can't manage a photo because they end up getting gobbled up almost immediately.
I've got several cucumbers about 4 inches long, at least 1 zucchini slightly bigger than the cucumbers. I like zucchini to be about as big as my forearm before I pick them because I use them for Fried Zucchini or cooked with tomatoes. Either way, bigger is better. (For Zucchini!)
If I can get a helper Friday I need to put up my homemade net for the cucumbers and feed their stringers through to keep the veggies off the ground. It looks kind of like a soccer net made out of garden twine. It will do the trick nicely.
We've also got 1 head of cauliflower about ready for picking. Looks like some Aloo Gobi is in our future. The whole family loves any Indian food and Aloo Gobi is a favorite.
I hope to have some garden pictures up over the weekend.
We started our garden late. I imagine many of you may be up to your eyeballs in tomatoes and zucchini.
Let us know how your garden is growing!
Lola's Victory Garden
©2009
I've got several cucumbers about 4 inches long, at least 1 zucchini slightly bigger than the cucumbers. I like zucchini to be about as big as my forearm before I pick them because I use them for Fried Zucchini or cooked with tomatoes. Either way, bigger is better. (For Zucchini!)
If I can get a helper Friday I need to put up my homemade net for the cucumbers and feed their stringers through to keep the veggies off the ground. It looks kind of like a soccer net made out of garden twine. It will do the trick nicely.
We've also got 1 head of cauliflower about ready for picking. Looks like some Aloo Gobi is in our future. The whole family loves any Indian food and Aloo Gobi is a favorite.
I hope to have some garden pictures up over the weekend.
We started our garden late. I imagine many of you may be up to your eyeballs in tomatoes and zucchini.
Let us know how your garden is growing!
Lola's Victory Garden
©2009
Subscribe to:
Posts (Atom)


